ugit
Remotes
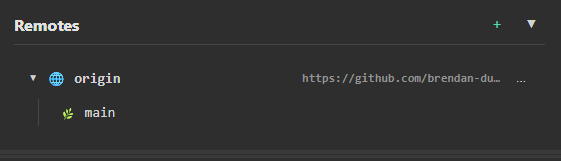
The Remotes panel displays remote repositories connected to your local repository. Remotes are used to synchronize your work with other repositories, typically on services like GitHub, GitLab, or Bitbucket.
Overview
The Remotes panel shows:
| Section | Description |
|---|---|
| Remote Name | The name of the remote (e.g., origin) |
| Remote URL | The web address of the remote repository |
| Remote Branches | Branches available on the remote |
Common Remote Names
| Name | Typical Use |
|---|---|
origin |
Your main remote (where you cloned from) |
upstream |
The original repository (for forks) |
Viewing Remotes
Expand a Remote
Click on a remote to expand and view its branches.
The panel shows:
- Remote icon (🌐) with remote name
- URL of the remote repository
- Branches available on that remote (e.g.,
origin/main,origin/develop)
Collapse a Remote
Click the remote again or use the collapse button to hide its branches.
Adding a Remote
Method 1: From RepoInfo Panel
- Right-click on the RepoInfo panel
- Select Edit Remote URL
- Enter the remote URL
- Click Save
Method 2: From Remotes Panel
- Click the + button in the Remotes panel header
- Enter a name (e.g.,
origin,upstream) - Enter the remote URL
- Click Add Remote
Remote URL Formats
HTTPS
https://github.com/username/repository.git
https://gitlab.com/username/repository.git
SSH
git@github.com:username/repository.git
git@gitlab.com:username/repository.git
ℹ️ ugit automatically converts SSH URLs to HTTPS when opening in a browser.
Remote Actions
Right-click on a remote for additional options:
| Action | Description |
|---|---|
| Open in Browser | Open the remote repository in your web browser |
| Copy URL | Copy the remote URL to clipboard |
| Edit | Change the remote URL |
| Delete | Remove this remote |
Remote Branch Actions
Right-click on a remote branch for options:
| Action | Description |
|---|---|
| Checkout | Create a local branch tracking this remote branch |
| Pull | Pull changes from this remote branch into current branch |
| Merge | Merge this remote branch into current branch |
| New Branch | Create a new branch based on this remote branch |
| New Tag | Create a tag at this remote branch |
| Delete | Delete this remote branch |
| Copy Name | Copy branch name to clipboard |
Fetching and Pulling
Fetch
Fetching downloads commits and branches from the remote without merging them into your local branches.
- Right-click on a remote → Fetch
- Or use the Fetch button in the toolbar
Pull
Pulling fetches and merges changes from a remote branch into your current branch.
- Right-click on a remote branch → Pull
- Or use the Pull button in the toolbar
Pushing
Push to Remote
- Make sure you have commits to push
- Click Push in the toolbar
- Or right-click on a branch → Push to Origin
Push a New Branch
When you push a new branch for the first time:
- Right-click on your local branch
- Select Push to Origin
- The branch will be created on the remote
Managing Multiple Remotes
Adding Upstream for Forks
If you forked a repository:
- Click + in Remotes panel
- Name:
upstream - URL: The original repository URL (not your fork)
- Click Add Remote
This lets you fetch changes from the original repository.
Syncing with Upstream
- Fetch from upstream:
git fetch upstream - Merge or rebase onto your branch
Troubleshooting
Remote Not Found
- Check the remote URL is correct
- Verify you have network connectivity
- Ensure you have permission to access the remote
Authentication Failed
- For HTTPS: Use a personal access token as your password
- For SSH: Ensure your SSH keys are configured and added to your Git hosting account
Push Rejected
The remote has changes that you don’t have locally. Pull first, then push:
- Pull from remote:
git pull origin branch-name - Resolve any conflicts
- Push again:
git push origin branch-name
Tips
Keep Your Remotes Clean
- Remove remotes you no longer use
- Use meaningful names (
originfor your fork,upstreamfor original)
Pull Regularly
- Pull frequently to stay up-to-date
- Pull before pushing to avoid conflicts
Use HTTPS for Quick Setup
- HTTPS doesn’t require SSH key configuration
- Use a personal access token for authentication
Related
- Branches — Managing local branches
- Local Changes — Managing uncommitted changes
- Cloning a Repository — Cloning from a remote